TreeBloom

Software and Media for Education

Projector

Projector Interface Screenshot
NEW VERSION 3.2.0

What's New in Projector

Welcome to Version 3.2.0! This release introduces critical usability enhancements, powerful visual planning shortcuts, and resolves key bugs to deliver an even smoother user experience.

๐Ÿ“‚ Direct File Opening

Open existing .json maps directly from the launch welcome screen. Automatically dismisses the startup dialog upon load, and features a deemphasized text link for the demo project.

๐ŸŒฑ Sprout Child Item Shortcut

Create sub-steps directly from any node's Options gear. Automatically offset horizontally, snaps to the nearest free grid cell downwards if occupied, and inherits parent background colors.

๐Ÿ—‘๏ธ Context Menu Deletion

Delete items instantly from each node's gear menu. Automatically cleans up all incoming and outgoing wire connections while leaving neighboring nodes untouched.

โœ๏ธ Real-time Naming Fix

Resolved a race condition where editing the project title reverted to "Untitled Map" upon canvas interactions. Title inputs now synchronize to state in real-time as you type.

๐Ÿ‘๏ธ Sidebar Selection Continuity

Selecting another node, clicking empty canvas space, or creating a new item now collapses open detail peeks, instantly focusing the active node's properties.

๐Ÿ’ก How to Update: Users will receive this latest version automatically through the standard Microsoft Store Update process.
Previous Releases
Version 3.1.2

This update delivers massive flexibility to your data modeling, introduces custom item types, adds dynamic controls to presentations, and refines the overall user experience.

๐Ÿท๏ธ Advanced Custom Fields

The custom field system supports 10 field types. Checkboxes are toggleable right in the canvas details peek, and URLs render as clickable hyperlinks.

โš™๏ธ Reusable Custom Types

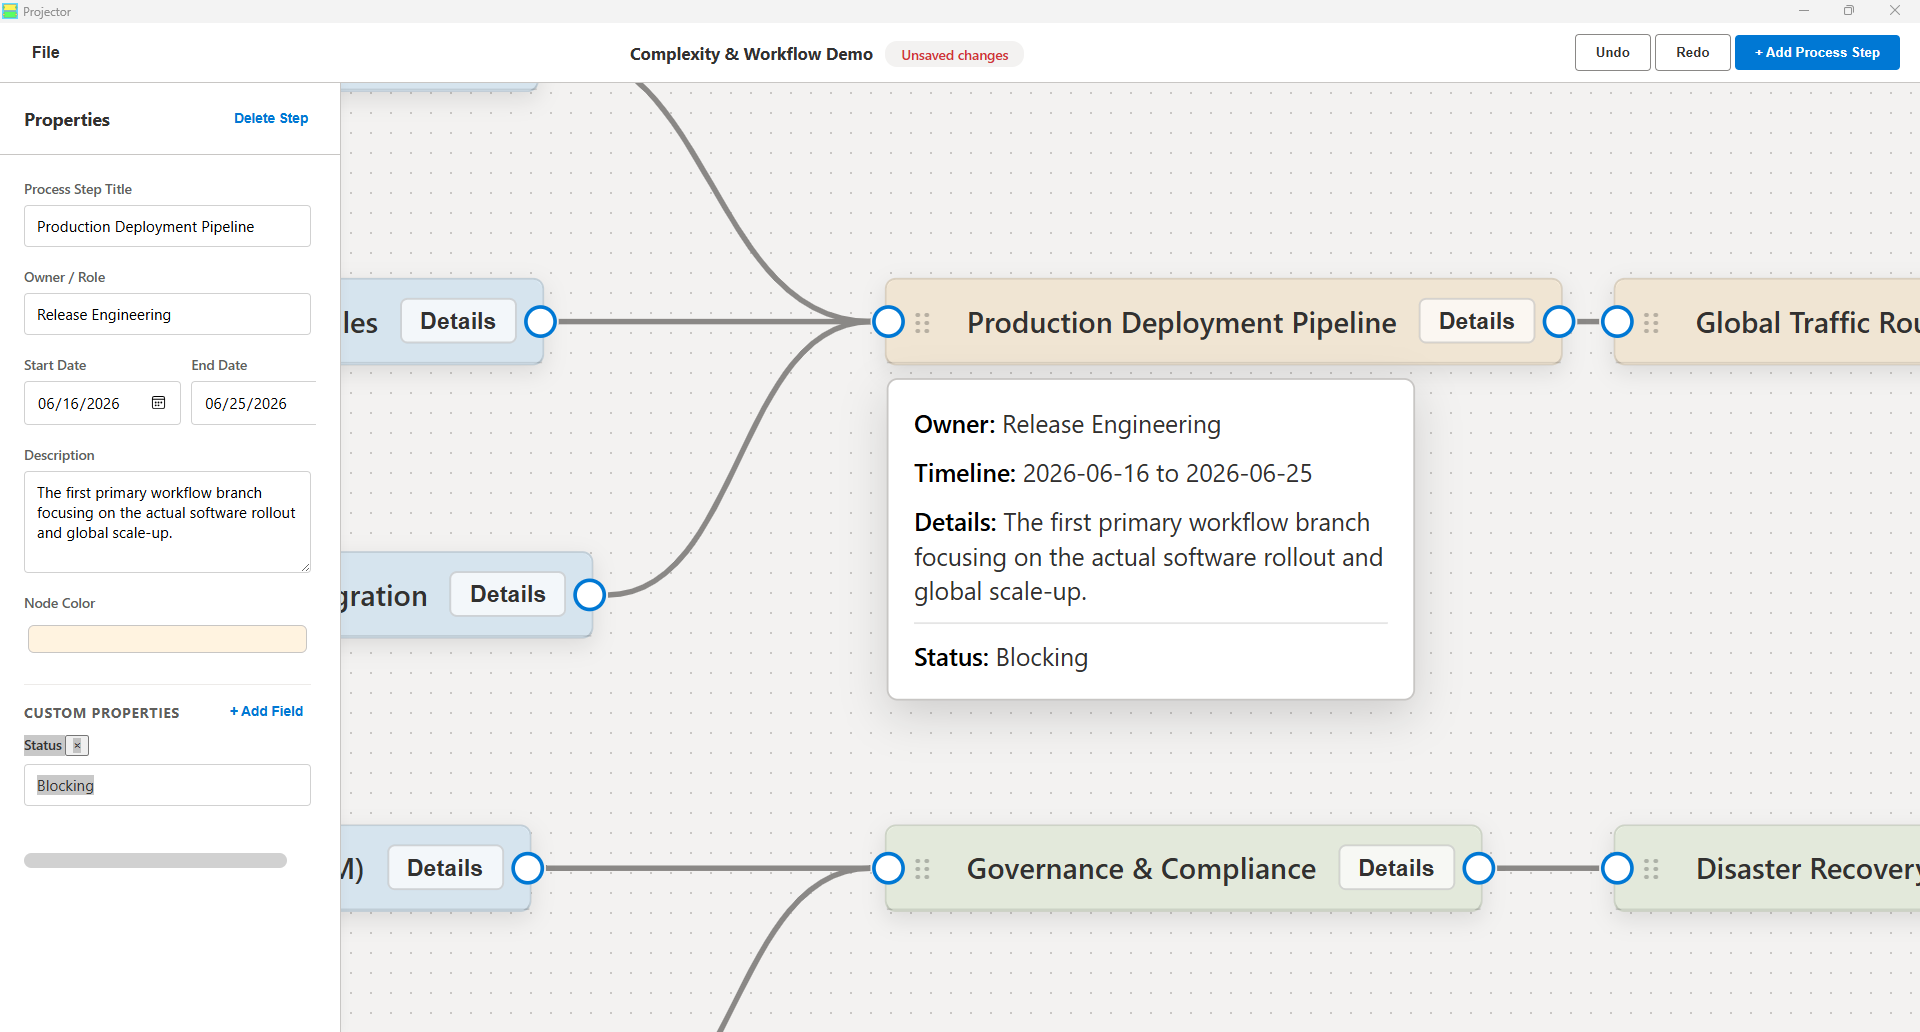
Save any configured node as a template type for quick replication. Your custom types are stored directly in your portable project map files, making sharing seamless.

๐Ÿ”„ Topological Presentation Flyover

Camera trajectories are computed using your connection wires. Visits predecessor items before descendants, handles loops gracefully with cycle-breaking safety, and auto-orders parallel tasks.

๐Ÿงผ Removable Fields & Cleaner UI

Delete standard fields like "Owner" or "Dates" per node for a simplified layout. Also featuring polished toolbar layout and unified button sizes.

A Visual Planning & Data Structuring Suite

Projector is a visual planning, node-based mapping, and data structuring tool. It allows you to build process maps, timelines, and relationships effortlessly while structuring rich data behind each visual element.

Visual Node-Based Mapping

Map steps, timelines, and ideas. Drag connecting wires between inputs and outputs to build diagrams that snap to a clean grid.

Local-First Security

Projector stores all templates, custom properties, and connection data directly on your local device. 100% private and offline-first.

Deep Exports & Formats

Save to portable JSON, export to CSV spreadsheets, output formatted narrative .docx documents, capture high-res PNGs, or record presentation videos.

Watch Projector in Action

User Documentation & Guide

Explore the comprehensive user manual to master Projector's planning and modeling interface.

1 Navigating the Workspace
  • Panning: Click and drag on any empty space in the grid-patterned workspace to pan around your map.
  • Zooming: Use your mouse scroll wheel to zoom in and out.
  • Zoom Controls: Located in the lower-right corner of the canvas. Click + to zoom in, - to zoom out, or click the percentage indicator to reset the zoom to 100%.
2 Managing Items (Nodes)
  • Add an Item: Click the + Add Item button in the top-right toolbar. A new item will spawn in the center of your screen.
  • Select an Item: Click on any item to highlight it. The properties panel on the left sidebar will update to show its details.
  • Move an Item: Click and drag the header bar (marked with a dotted handle โ‹ฎโ‹ฎ) of any node to move it around the grid. Nodes snap to a clean grid layout.
  • Delete an Item: Select the item and click Delete Item in the sidebar header, or press the Delete / Backspace key on your keyboard.
3 Editing Properties
  • Standard Properties: By default, every item contains three core properties: Name (title shown on the item card), Description (detailed text), and Color (click the swatch to change the item's background color on the canvas).
  • Optional Standard Properties: You can delete optional standard properties (Owner / Role, Start Date, and End Date) per node by clicking the delete button (ร—) next to them in the sidebar properties panel. This keeps your cards clean. Deleting a property also clears its values.
4 Custom Properties

Expand the structured data of any item by adding custom fields:

  • Adding a Custom Property: Select an item, click + Add Custom Field at the bottom of the properties panel, choose a name (key) and a field type. If using a Dropdown/Select type, enter a comma-separated list of options. Click Add Field.
  • Supported Custom Field Types:
    • Text & Text Area: Standard single-line or multi-line textboxes.
    • Number: Digital inputs.
    • Date & Time: Calendar and time selectors.
    • Color: Swatches matching the default color picker styling.
    • Checkbox: Toggles displaying as interactive checkboxes in the canvas details peek.
    • Dropdown/Select: Custom select list populated with your choices.
    • URL & Email: Validated inputs. URLs render as clickable hyperlinks in the peek window.
5 Connections (Wires)
  • Create a Connection: Drag from the circular connection handle on the right side (output) of one item and drop it onto the connection handle on the left side (input) of another item.
  • Delete a Connection: Click on a wire to select it (it will highlight in red), then press the Delete or Backspace key on your keyboard.
6 Item Detail Peek
  • Click the Details button on any item card to expand its detail peek.
  • The peek acts as a popover displaying the Description, Dates, Owner, and all Custom Properties.
  • URLs are clickable, checkboxes are interactive, and custom selectors show their current options directly within this peek window. Click Details again to collapse it.
7 Duplication and Custom Item Types
  • Instantly Duplicate: Click the gear icon (โš™) in the header of the item you want to copy, and select Duplicate. A new copy offset by +40px appears.
  • Save as Custom Type: Click the gear icon (โš™) on an item, select Save As Type, and provide a name. Your template is saved directly into the project's data model.
  • Spawning Custom Types: Click the Add Item Type button in the top toolbar to see a dropdown of all saved templates. Click any custom type to spawn it, or click the delete button (ร—) next to any type to remove it. Custom types are serialized inside the project map file itself, making them fully portable.
8 Presentation Mode (Flyover)
  • Start Presentation: Click File in the menu bar and select Start Presentation.
  • Mode Choice: Choose Automatic (camera flies from node to node focusing and opening detail peeks every 2 seconds) or Manual (use the controls overlay at the bottom to navigate).
  • Exit: Click Exit Presentation or click the canvas.
  • Traversals Order: Path is determined dynamically by wires: predecessor nodes are visited before descendants; parallel networks leftmost-to-rightmost; nodes sharing the same horizontal axis are sorted top-to-bottom; circular loops are dynamically broken to prevent hangs.
9 File Operations (File Menu)

Click File in the top-left corner to access operations:

  • New Map & Open...: Start blank projects or load .json maps.
  • Save / Save As...: Save the project map. Custom fields, configurations, layouts, and custom item types are serialized directly into the file.
  • Export CSV: Download a spreadsheet of your map's items, positions, connections, standard fields, and custom properties.
  • Export Narrative (.docx): Generate a written document of your node map, detailing item descriptions, owners, and custom properties.
  • Export Map as Image: Capture the visible canvas coordinates and download as a high-quality PNG.
  • Record Presentation: Record your flyover presentations directly to video.